
Estimated reading time: 6 minutes
There’s a roast beef sandwich I always order at one of our favorite restaurants. It comes with melted Swiss, sweet caramelized onions, and garlic aioli. My husband and I love trying new toppings on the grill, so I figured, why couldn’t all of that go on a pizza? That’s how this Garlic Aioli Beef Pizza came to be.
The aioli goes right on the crust as the sauce. Then comes the shredded roast beef, plenty of Swiss, and onions cooked just until they start to turn golden. I like roasting the garlic first because it mellows out and gets a little sweet. And if you’ve got leftover roast beef in the fridge, you’re already halfway to pizza night.
THIS POST MAY CONTAIN AFFILIATE LINKS. I MAY EARN A COMMISSION IF YOU PURCHASE THROUGH ONE OF THESE LINKS. PLEASE SEE MY FULL DISCLOSURE POLICY FOR DETAILS. AS AN AMAZON ASSOCIATE, I EARN FROM QUALIFYING PURCHASES.
If you’re making a couple of pizzas, put this one on the table with my Chicken Caesar Salad Pizza. The cool, crunchy Caesar topping is so good alongside a hot, cheesy slice of this one.
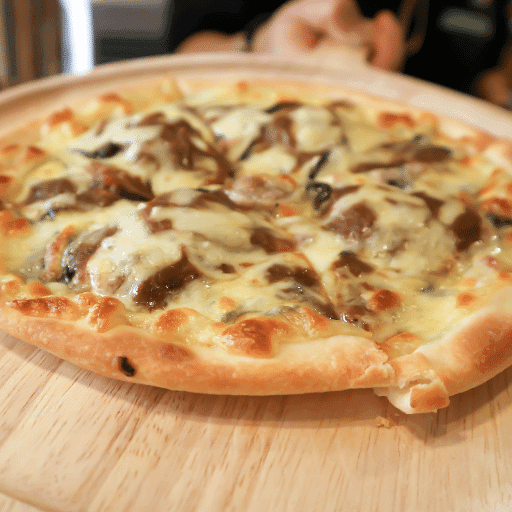
Table of contents
Why You’ll Love This Garlic Aioli Beef Pizza
- Leftover roast beef has a whole new job. Shred it up and scatter it over the pizza.
- The garlic aioli does the work of a pizza sauce. Fresh lemon brightens it up, and roasted garlic gives it a mellow flavor that goes so well with the Swiss.
- You can grill it or bake it. Grab a store-bought crust for an easy dinner, or make the dough from scratch when you have time.
Ingredients You’ll Need
- Pizza crust. Use one 12-inch crust. My Homemade Pizza Crust works here, and a store-bought crust makes dinner that much easier.
- Cooked roast beef. Shred it into bite-size pieces so it’s easy to spread over the pizza and you get a little in every bite.
- Swiss cheese. Shredded Swiss melts over the aioli and gives the pizza the same nutty flavor I love in that sandwich.
- Onion. A yellow onion works well here. Slice it thinly so it softens evenly and gets a little golden in the skillet.
- Garlic aioli. Mayonnaise, fresh lemon juice, garlic, olive oil, salt, and pepper make a creamy sauce with just enough tang to balance the beef and cheese.
- Cornmeal and fresh chives. A light dusting of cornmeal helps the crust slide off the peel. Chopped chives are optional, but I like the little bit of fresh onion flavor they add at the end.
How to Make Garlic Aioli Beef Pizza
- Preheat the oven or grill. Set the oven to 450°F or the grill to medium-high. If you’re using a pizza stone, put it in before preheating. Use a grill-safe stone if you’re cooking outside.
- Whisk together the aioli. In a small bowl, mix the mayonnaise, fresh lemon juice, roasted garlic, olive oil, salt, and pepper. Then pop it in the fridge while you get the onions ready.
- Cook the onions. Drizzle a little olive oil into a medium skillet and cook the sliced onion over medium heat, stirring occasionally. When the slices are soft and starting to turn golden, they’re ready.
- Build the pizza. Lightly dust your pizza peel with cornmeal and set the crust on top. Spread the aioli across the crust, then add the shredded Swiss, roast beef, and onions.
- Bake or grill. Slide the pizza onto the hot stone. If you’re using the grill, close the lid. Cook for 10 to 12 minutes, until the crust is golden brown and the cheese has melted. Finally, sprinkle with chopped chives, slice, and dig in.
Nettie’s Tips and Variations
How to Roast Garlic for the Aioli
Cut the top off a whole head of garlic to expose the cloves. Drizzle the cut side with a little olive oil, wrap it in foil, and roast at 400°F for 35 to 45 minutes, until the cloves are soft and golden. Let the garlic cool a bit, then squeeze the cloves out of their skins and mash them before whisking them into the aioli.
Give the Peel a Little Shake
Once you’ve added the toppings, gently shake the peel to make sure the pizza still slides. If an edge sticks, lift it and sprinkle a little cornmeal underneath. It’s much easier to do that at the counter than over a hot grill.
Try It With Leftover Steak
If you’ve got leftover grilled steak, slice it thinly across the grain and use it in place of the roast beef. The Swiss, onions, and garlic aioli go just as well with steak.
Shop Nettie’s Kitchen Favorites
Looking for the kitchen tools and cookware I use? Visit my Amazon Storefront to shop my favorite baking dishes, appliances, cookware, grilling tools, and more.
As an Amazon Associate I earn from qualifying purchases.
FAQ
Can I use raw garlic in the aioli?
Yes. Finely mince it so it mixes evenly into the sauce. Raw garlic tastes sharper than roasted garlic, so if you prefer a milder sauce, start with a few cloves and add more to taste.
Can I make this pizza without a pizza stone?
Yes. In the oven, use a pizza pan or a sturdy baking sheet. If you’re using a packaged crust, check its directions for any par-baking instructions and start checking the pizza early, since the crust may brown at a different rate.
Can I make the garlic aioli ahead of time?
Yes. Whisk it together the day before and refrigerate it in a covered container. Give it a quick stir before spreading it on the crust.
Storage and Reheating
Refrigerate. Put leftover slices in an airtight container and refrigerate them within 2 hours, or within 1 hour if it’s above 90°F. Use refrigerated leftovers within 3 to 4 days
Freeze. Wrap individual baked slices and tuck them into a freezer bag. Thaw them in the fridge before reheating.
Reheat. Put the slices on a baking sheet in a 350°F oven so the bottoms can crisp up again. Heat until the center reaches 165°F.
What to Serve With Garlic Aioli Beef Pizza
I like something cool and crunchy on the side, and my Creamy Cucumber Onion Salad fits right in. If the grill is already hot, throw on a batch of Grilled Zucchini Spears while you’re getting dinner ready.
If you make this pizza, leave a rating and tell me how you cooked it. Did you fire up the grill or bake it in the oven? And if you’d like more easy dinners and old favorites in your inbox, sign up for my Recipe Bowl newsletter. Let’s mix it up!
Reader Favorites
Apparel for the foodies & grillers

Garlic Aioli Beef Pizza
Ingredients
Garlic Aioli
- ½ cup mayonnaise
- 1½ tablespoons olive oil
- 2 tablespoons lemon juice fresh
- 1 head garlic roasted and mashed, or finely minced raw
- ½ teaspoon salt
- ¼ teaspoon pepper
Pizza
- 1 12- inch pizza crust homemade or store-bought
- 12 ounces Swiss cheese shredded
- 2 cups roast beef shredded
- 1 medium onion cooked, thinly sliced
- Olive oil a drizzle for the skillet
- Cornmeal for dusting the pizza peel
- 2 tablespoons chopped fresh chives optional garnish
Instructions
- Preheat the oven to 450°F or the grill to medium-high. If using a pizza stone, place it in the oven or on the grill before preheating.
- In a small bowl, whisk together the mayonnaise, 1½ tablespoons olive oil, lemon juice, garlic, salt, and pepper. Refrigerate until ready to use.
- Heat a drizzle of olive oil in a medium skillet over medium heat. Add the sliced onion and cook, stirring occasionally, until soft and lightly caramelized.
- Lightly sprinkle a pizza peel with cornmeal and place the crust on the peel. If baking without a stone, assemble the pizza directly on a pizza pan or baking sheet.
- Spread the garlic aioli evenly over the crust. Sprinkle with the shredded Swiss and roast beef, then top with the onions.
- Slide the pizza onto the preheated stone, or place the pan in the oven. If grilling, close the lid. Cook for 10 to 12 minutes, until the crust is golden brown and the cheese is melted.
- Remove the pizza from the oven or grill. Sprinkle with the optional chives, cut into 6 slices, and serve
Notes
Recipe Notes
- Garlic. Roasted garlic gives the sauce a sweeter, milder flavor. If using raw garlic, start with a few cloves for a gentler flavor and add more to taste.
- Timing. The cook time in the card is for the pizza itself. If you’re making homemade dough, allow extra time for mixing and rising.
- Make ahead. Mix the aioli a day ahead and refrigerate it in a covered container. Assemble the pizza when you’re ready to cook.
- Leftovers. Refrigerate slices in an airtight container and reheat in the oven to crisp the crust again.